分类 技术探讨 下的文章

说实话用了这么长时间的vue,都没看过API,这几天重构博客偶然发现Vue.directive,挺厉害的样子

总是看到这里用Vue.use(ElementUi),那里用Vue.use(axios),一直停留在了用的层面,正好我发现编写markdown解析实例的消耗好像有点大,直接处理成指令或许会方便很多(真的方便了很多,少写了一堆方法)

简单描述一下流程吧

渲染文章的组件在挂载的生命周期中,会查询本地记录中是否存在对应的文章,不存在就发起请求线上查找,否则404。
文章为markdown内容,考虑让前端处理直接解析出来(毕竟前端性能过剩233),减少后端逻辑处理负担,一致性什么现在是不需要考虑的。
markdown解析器就用marked,完成逻辑如下

//main.js

import Vue from 'vue'
import App from './App'
import markdown from './markdown';

//注入markdown解析器
Vue.use(markdown.install)
Vue.prototype.$marked = markdown.marked

new Vue({
    store,
    router,
    render: h => h(App)
}).$mount('#app')

集成marked制成插件形式暴露

//markdown.js

import marked from 'marked'
import('highlight.js/styles/atom-one-dark.css')

marked.setOptions({
    renderer: new marked.Renderer(),
    pedantic: false,
    gfm: true,
    tables: true,
    breaks: false,
    sanitize: false,
    smartLists: true,
    smartypants: false,
    xhtml: false,
    highlight(code) {
        return require('highlight.js').highlightAuto(code).value;
    },
})

let install = (Vue) => {
    if (install.installed) return;
    Vue.directive('markdown', {
        bind: (el, binding, vnode) => {
            el.innerHTML = marked(binding.value)
        },
        update: (el, binding, vnode) => {
            el.innerHTML = marked(binding.value)
        }
    })
}

export default {
    marked,
    install,
}

在标签上使用v-markdown指令

//Test.vue

<template>
    <div>
        <div v-if="isNotFound">404</div>
        <div v-else v-markdown="article"></div>
    </div>
</template>

<script>
    const 这是一个查找文章的接口 = function () {
        return new Promise((resolve, reject) => {resolve(id)})
    }

    export default {
        name: "Test",
        data() {
            return {
                article: '',
                isNotFound: true,
            }
        },
        methods: {
            handlerArticle(id) {
                //查找本地文章
                let a = this.findArticle(id, async (id) => {
                    return await 这是一个查找文章的接口(id);
                })
                if (a == null) {
                    return 404;
                }

                return a;
            },
            findArticle(id, callback) {
                // let res = '## Test';
                let res = null;
                if (res === null) {
                    return callback(id);
                }

                return res;
            }
        },
        mounted() {
            //用id来查找文章
            let a = this.handlerArticle(123);

            if (a === 404) {
                //跳到错误页面
            }

            //处理loading
            this.isNotFound = false;
            this.article = a;  //将markdown内容直接保存到变量
        }
    }
</script>
完整代码参阅: https://gist.github.com/flxxyz/93e009d32ecd7e0c6785a52571577cd7

蹭了学生优惠,买了个阿里云轻服务器,5M带宽转国外线路减少丢包概率还不错,ns联机美滋滋,不过据说港服联机服务要出了,不知道联机质量会怎么样

firewall中继栗子

# 打开ip伪装
firewall-cmd --add-masquerade --permanent

# 添加端口协议
firewall-cmd --add-forward-port=port=中转后的端口:proto=tcp:toport=酸酸乳端口:toaddr=酸酸乳地址 --permanent
firewall-cmd --add-forward-port=port=中转后的端口:proto=udp:toport=酸酸乳端口:toaddr=酸酸乳地址 --permanent

# 重载一下
firewall-cmd --reload

koolshare里面大家好像用的都是StarWind V2V Converter这款软体,再就是用PE里面的写盘工具

然鹅,在macos不能玩这些windows的工具,搜索发现virtual box自带的命令集,真香!

VBoxManage --help一下什么都有,新建,修改,删除,网络适配器,DHCP,共享文件夹...

.img转换.vdi脱离GUI,shell冲冲冲!

$ VBoxManage convertdd openwrt-koolshare-mod-v2.22-r8838-af7317c5b6-x86-64-combined-squashfs.img 1.vdi

一个虚拟机转盘完成,秒转

最近在捣鼓golang,其中用线上数据全放在redis里,以前写死的配置有点不太适合了,热加载才是王道!

俗话说不会搜索的程序员不是一个好程序员(误

观摩了一下其他大佬的写法,大多都是采用定时器+goroutine实现的。难度不大,开始码

配置文件结构体

假设一下我们的配置文件是json文件,那应该就是下面这样

// conf.json
{
  "host": "127.0.0.1",
  "port": 6379,
  "passwd": "",
  "db": 0
}

首先肯定是要写一个跟它一模一样的结构体出来

//json配置文件结构体
type Content struct {
    Host   string `json:"host"`
    Port   int    `json:"port"`
    Passwd string `json:"passwd"`
    Db     int    `json:"db"`
}

如果继续在此结构体上编写操作函数不太稳妥,序列化json也是直接操作的指针。之前拆散它们的试错,最后还是让它们在一起了233

优化结构体

将文件名,同步锁,最后修改时间,配置文件结构体整合一起

//配置结构体
type Config struct {
    Filename       string
    LastModifyTime int64
    Lock           *sync.RWMutex
    Data           interface{}
}

编写实例配置的工厂函数(这个有点约定俗成的规矩,具体出处你们自己去考证吧,好处挺多的)

func NewConfig(filename string, data interface{}) *Config {
    conf := &Config{
        Filename: filename,
        Data: data,
        Lock: &sync.RWMutex{},
    }

    conf.parse()

    go conf.reload()

    return conf
}

这里把配置结构体配置了默认参数,外部传入参数是配置文件的文件名配置文件结构体,这里data的类型为接口类型,好处是Config可以独立出来,代码多处复用。我们还使用了conf.parse()方法,第一次解析文件,go conf.reload()方法单独起一个goroutine跑(具体效果看后面),结果当然返回本体了

- 阅读剩余部分 -

这段时间在捣鼓tars框架,去vultr开了个3.5刀的机器,为什么要用他们家的呢,因为之前冲的50刀没用完????无奈呀

他家的机器对湖北电信非常不友好,创建必须要装bbr不然丢包够你受的,加大发包量,用的还挺爽的

这两天空闲了下,上线登陆发现有1w+的暴力登陆!!!

wtf!

network-attacks.png

第一次感受到这么泛滥的网络攻击,今天简单介绍一下修改sshd监听端口防范暴力破解

这里我开始就把selinux关掉了,你可以选择关闭selinux,因为会少很多麻烦事,当然也会产生隐形的问题,不过利大于弊

- 阅读剩余部分 -

为什么

为什么要开发积分商城呢?

因为我们之前使用的是兑吧的服务,还不错

但是得知今年(2018)下半年关闭免费版的服务,需要付费购买专业版或旗舰版使用

当然兑吧的工作人员也联系过我们,可以给予优惠价格,商业互吹肯定要说“好的,我们会讨论考虑一下”

如果我们用了兑吧,那你也不会看到这个文章了23333

开始

我整体的浏览了他们的商品管理,减去了一些与我们业务无关的功能

主要功能为兑换方式了,他们采用的是纯积分,积分+人民币的策略,我也就加了一个人民币支付方式(也不麻烦),包邮与运费功能均减去(因为我们就是包邮的)

差不多需要开发的主要功能项就是分类管理商品管理支付

这里的支付我相信大家去学习一下支付宝和微信的文档,应该都会的。

设计

开始我们的表结构设计了

分类表应该是最轻松的,一般结构是自增id,名称,图片(有图片的分类),显示顺序,状态这些。

表应该就是下面这样子了

create table if not exists `score_shop_classify` (
    `id` int(11) unsigned AUTO_INCREMENT,
    `name` varchar(191) not null DEFAULT '' comment '菜单名称',
    `img` text comment '菜单图片',
    `show_order` int(11) not null DEFAULT 0 comment '显示顺序0最大',
    PRIMARY KEY (`id`)
) engine=InnoDB DEFAULT CHARSET=utf8mb4;

再就是商品表了,分析一下操作界面上的展示信息,大致可以了解到商品名称,价值,描述信息,图片,库存数量,可兑换次数。

分析出的表结构是这样的

create table if not exists `score_shop_goods` (
    `id` int(11) unsigned AUTO_INCREMENT,
    `menuid` int(11) not null DEFAULT 0 comment '所属分类',
    `good_type` varchar(32) not null DEFAULT 'object' comment '区分实体商品与虚拟商品 object实体商品 virtual虚拟商品 coupon优惠卷',
    `good_name` varchar(100) not null DEFAULT '' comment '商品名称',
    `good_icon` text not null comment '商品icon',
    `good_pic` text not null comment '商品图片',
    `good_desc` text comment '商品描述',
    `good_stock` int(11) not null DEFAULT 0 comment '商品库存',
    `exchange_type` tinyint(4) not null DEFAULT 0 comment '商品种类 0积分 1人民币 2积分+人民币',
    `exchange_info` text not null comment '关于商品价格的信息',
    `exchange_num` int(11) unsigned not null DEFAULT 1 comment '用户最多兑换次数 0无限制 默认1次',
    `created_time` int(11) unsigned not null DEFAULT 0 comment '创建时间',
    `updated_time` int(11) unsigned not null DEFAULT 0 comment '更新时间',
    PRIMARY KEY (`id`)
) engine=InnoDB DEFAULT CHARSET=utf8mb4;

这套积分商城结构应该是需要把支付表另外独立出来一个,不与之前已有的支付表冲突,但是需要存在关联点,我这个仅供参考

create table if not exists `score_shop_pay_record` (
    `id` int(11) unsigned AUTO_INCREMENT,
    `user_id` int(11) unsigned not null DEFAULT 0 comment '用户ID',
    `pay_id` int(11) unsigned not null DEFAULT 0 comment '购买的商品ID',
    `oid` varchar(50) not null DEFAULT 0 comment '订单ID',
    `pay_type` tinyint(4) not null DEFAULT 0 comment '支付类型,1微信支付 2支付宝支付',
    `money` int(11) unsigned not null DEFAULT 0 comment '支付金额,单位分',
    `score` int(11) unsigned not null DEFAULT 0 comment '支付积分',
    `log` varchar(255) not null DEFAULT '' comment '备注信息',
    `pay_time` int(10) unsigned not null DEFAULT 0 comment '支付时间',
    `created_time` int(10) unsigned not null DEFAULT 0 comment '创建订单时间',
    `updated_time` int(10) unsigned not null DEFAULT 0 comment '更新订单时间',
    `status` tinyint(4) not null DEFAULT 0 comment '支付状态,0充值失败 1充值成功未发货 2已发货 3客户端支付成功 4客户端取消支付',
    PRIMARY KEY (`id`)
) engine=InnoDB DEFAULT CHARSET=utf8;
这里的status是为了兼容app支付,这套体系是web端的h5支付

准备写bug前的小问答

Q: 傻逼网友发的什么几把

我: 看不懂不要紧,学习之后就能看懂,努力????

Q: 求源码

我: 文章里的代码 ≈ 源码。(想装逼的时候应该会写源码发出来)

Q: 在前面的表设计里面,我没有看到存放的物品,显示价格呀

我: 终于有个老哥正经问问题了,看score_shop_goods表里的exchange_info字段,描述的是“关于商品价格的信息”,这里存放的是个json字符串,便于扩展信息,让表结构看着不会过于混乱

//人民币(单位: 分)
{
    "price":199,
    "discount":0,
    "goods":{
        "coin":20  //兑换的商品为20金币
    }
}
//积分
{
    "score":5999999,
    "discount":85,  //这里我引入了个折扣,兑换????打85折
    "goods":{
        "car":81  //兑换的商品为一辆id=81的小汽车(可随意扩展)
    }
}
//积分+人民币,要好好说说
//PS: 这里要注意的是1积分等同于1分钱,怎么调整发放积分那是你的事咯
//通常情况下一台价值8999的单反相机给出的兑换价格为40000积分+8599元,这里我们引入的新功能是,用户存在比40000积分还多的积分可以自己调节兑换的积分,以达到使用积分来抵扣人民币的目的,这就需要对积分的严格把控了。当然也不是随意的由用户调节,这样我们相机会收不回成本。所以加入了两个界限值,最大积分和最小人民币,用户调节积分的数值不能超过最大积分,这样即给予了用户自主的权利,又控制了我们的损失,对我们写bug的后面比对实际支付价值也友好一些
{
    "score":40000,
    "max_score":50000,
    "price":859900,
    "min_price":849900,
    "discount":95,
    "goods":{
        "camera":78  //兑换一台id=78的????
    }
}
// 打折计算: (换算成人民币乘100)
// 总价值 40000+859900=899900
// 打折的总价值 (40000+859900)*0.95=854905
// 用户需要支付 (((40000+859900)*0.95)-40000)=814905
// 打折的价钱 859900-814905=44995
// 打折加最大可用积分相当于便宜了1000块钱。。。

写bug

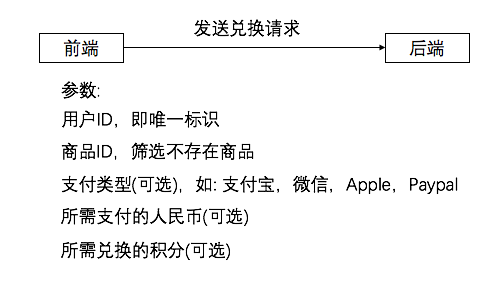
前端需要的几个操作:

  • 读取分类 (这个可以和读取分类商品合并成一个首页接口)
  • 读取分类商品
  • 读取商品信息
  • 兑换商品
  • 读取所有兑换记录
  • 读取单条兑换记录
  • 查询兑换记录状态 (轮询)
这里的前端不是特指web,指android,ios,web,桌面应用

后端实现上述几个接口,另外需要整合支付,重点讲兑换商品接口

流程

代码的执行部分这里我就拿伪代码来写

function convertGoods($用户ID, $商品ID, $支付类型, $支付人民币, $支付积分) {
    $商品 = $商品表->查找($商品ID);
    
    //检查$商品是否存在或出错
    if $商品 === 不存在
        return 不存在;
    
    //检查$商品的库存<=0
    if $商品->stock <= 0
        return 库存不足,停止兑换;
    
    $商品的价格信息 = JSON解码($商品->exchange_info);
    
    $商品的支付方式 = $商品->exchange_type;
    
    $用户 = $用户表->查找($用户ID);
    
    //用户没有积分,商品的支付方式也不需要积分
    if ($商品的价格信息->score > $用户->score) && ($商品的支付方式 == 0 || $商品的支付方式 == 2)
        return 积分不足;

    $兑换次数 = $支付表->查找(用户ID=$用户ID, 商品ID=$商品ID, 支付状态=2)->统计次数
    
    //检查兑换次数
    if $商品->exchange_num !== 0
        if $兑换次数 >= $商品->兑换次数
            return 超过兑换次数;

    //检查金额合法性
    $商品的价格信息->price = $商品的价格信息->price == 不存在 ? 0 : $商品的价格信息->price;
    $商品的价格信息->score = $商品的价格信息->score == 不存在 ? 0 : $商品的价格信息->score;
    
    if ($支付人民币 + $支付积分) != ($商品的价格信息->price + $商品的价格信息->score)
        return 兑换所需的金额不正确;
    
    switch ($商品的支付方式) {
        case 0:
            //积分支付
            
            $支付表写入ID = $支付表->写入(支付积分, 支付时间, 等待发货状态);
            
            //扣除用户积分
            $用户表->查找($用户ID)->更新($用户->score - $支付积分);
            
            //更新商品库存
            $商品表->查找($商品ID)->更新($商品->stock - 1);
            
            //发送物品的逻辑需要自己实现
            
            if 发送物品失败
                $支付表->查找($支付表写入ID)
            
            return 兑换成功;
            
            break;
        case 1:
            //人民币支付
            
            if $支付类型 !== 0 && $支付类型 !== 1 && $支付类型 !== 2
                return 请正确选择支付方式;
            
            //此处的发货状态是需要在支付宝或微信的回调中处理,我们只能先预设成待发货状态
            $支付表->写入(支付积分, 支付时间, 等待发货状态);
            
            $支付参数 = $支付SDK->生成订单;
            
            //处理支付宝或微信的交易逻辑需要自己实现
            if $支付参数 === 订单没有生成
                return 获取支付参数失败;
            else
                return 兑换成功;
            
            break;
        case 2:
            //积分+人民币支付
            
            if $支付类型 !== 0 && $支付类型 !== 1 && $支付类型 !== 2
                return 请正确选择支付方式;
            
            //检查金额与积分范围
            if $支付人民币 < $商品的价格信息->min_price
                $支付人民币 = $商品的价格信息->min_price;
                $支付积分 = $商品的价格信息->max_score;
            else if $支付人民币 > $商品的价格信息->price
                $支付人民币 = $商品的价格信息->price;
                $支付积分 = $商品的价格信息->score;
            
            //此处的发货状态是需要在支付宝或微信的回调中处理,我们只能先预设成待发货状态
            $支付表->写入(支付积分, 支付时间, 等待发货状态);
            
            $支付参数 = $支付SDK->生成订单;
            
            //处理支付宝或微信的交易逻辑需要自己实现
            if $支付参数 === 订单没有生成
                return 获取支付参数失败;
            else
                return 兑换成功;
            
            break;
    }
}

最后

代码流程完成,如果实际编写bug需要考虑到其他的问题,如:一件物品两人同时兑换只发一个人,减少查询负担,处理数据库在兑换过程中挂掉等

数据库里也没有加入索引,如果商品或者支付越来越多,查询所需的时间也要更长

做好优化任重而道远

一般设置代理只需按以下来设置是没有问题的,但是今天我们要操作的websockt

server {
    location / {
        proxy_pass http://127.0.0.1:10086;
        proxy_set_header Host $host;
        proxy_set_header X-Real-IP $remote_addr;
        proxy_set_header X-Forwarded-For $proxy_add_x_forwarded_for;
        proxy_set_header REMOTE-HOST $remote_addr;
        proxy_http_version 1.1;
        proxy_read_timeout 300s;
    }
}

nginx -t一下

会出现如下错误:
nginx: [emerg] unknown "connection_upgrade" variable

就是这里出现了个坑

其中涉及到了一个nginx的设计问题 End-to-end and Hop-by-hop Headers
我在这里还是不过多赘述了,以免误人子弟

map在nginx中是为一个或多个变量设置映射表

下面是需要添加的几项配置:

http {
    map $http_upgrade $connection_upgrade {
        default upgrade;
        ''      close;
    }

    server {
        location / {
            #…
            proxy_set_header Upgrade $http_upgrade;
            proxy_set_header Connection $connection_upgrade;
        }
    }
}

自己编译php版本时出现的错误,哦,顺带说一句,可能php7以下会有出入,纯净系统
好长时间也是没有出文了,文档不是很想整理(¦3[____]
# 编译参数,基本就是自带的全装了
'./configure' '--cache-file=/opt/temp/cache/config.cache' '--prefix=/opt/temp/php/php-7.2.6' '--with-config-file-path=/opt/temp/php/php-7.2.6/etc' '--with-config-file-scan-dir=/opt/temp/php/php-7.2.6/var/db' '--disable-all' '--enable-short-tags' '--enable-opcache' '--enable-dba' '--enable-ipv6' '--enable-calendar' '--enable-wddx' '--enable-static' '--enable-inifile' '--enable-inline-optimization' '--enable-cli' '--enable-ftp' '--enable-filter' '--enable-gcov' '--enable-maintainer-zts' '--enable-json' '--enable-hash' '--enable-exif' '--enable-mbstring' '--enable-mbregex' '--enable-libgcc' '--enable-pdo' '--enable-posix' '--enable-embed' '--enable-sockets' '--enable-debug' '--enable-phpdbg' '--enable-zip' '--enable-bcmath' '--enable-fileinfo' '--enable-ctype' '--enable-cgi' '--enable-soap' '--enable-pcntl' '--enable-phar' '--enable-session' '--enable-tokenizer' '--with-imap-ssl' '--with-ldap' '--with-tidy' '--with-kerberos' '--with-xmlrpc' '--enable-fpm' '--enable-dtrace' '--with-pcre-regex' '--with-pcre-dir=/usr' '--with-mhash' '--with-mcrypt=/usr' '--with-zlib=/usr' '--with-curl=/usr' '--with-readline=/usr' '--with-libedit=/usr/local' '--with-gd=shared' '--enable-gd-native-ttf' '--with-png-dir=/usr' '--enable-intl' '--with-openssl=/usr' '--with-mysqli=mysqlnd' '--with-pdo-mysql=mysqlnd' '--with-sqlite3' '--with-pdo-sqlite' '--with-pgsql=/usr/bin' '--with-pdo-pgsql=/usr/bin' '--enable-dom' '--enable-libxml' '--enable-simplexml' '--enable-xml' '--enable-xmlreader' '--enable-xmlwriter' '--with-xsl' '--with-libxml-dir=/usr' '--with-gettext=/usr' '--with-iconv' '--with-bz2=/usr' '--enable-shmop' '--enable-sysvsem' '--enable-sysvshm' '--enable-sysvmsg' '--with-gmp=/usr' '--with-pear=/opt/temp/php/php-7.2.6/lib/php/pear' '--with-libdir=lib64' '--with-mcrypt=/usr/lib64' '--with-readline'

错误: configure: error: Please reinstall the libcurl distribution – easy.h should be in/include/curl/
解决方法: yum install -y curl-devel

错误: configure: error: jpeglib.h not found.
解决方法: yum install -y libjpeg-devel

错误: configure: error: png.h not found.
解决方法: yum install -y libpng-devel

错误: configure: error: To enable code coverage reporting you must have LTP installe
解决方法: yum install -y lcov

错误: configure: error: Cannot find sys/sdt.h which is required for DTrace support
解决方法: yum install -y systemtap-sdt-devel, apt install -y systemtap-sdt-dev

错误: configure: error: Cannot find OpenSSL's libraries
解决方法: yum install openssl openssl-devel openssl-libs
备注: 64位系统在编译时加上--with-libdir=/usr/lib64, 或者把/usr/lib64/libssl.so复制到/usr/lib/libssl.so

错误: configure: error: Unable to locate gmp.h
解决方法: yum install -y gmp gmp-devel

错误: configure: error: Unable to detect ICU prefix or no failed. Please verify ICU install prefix and make sure icu-config works.
解决方法: yum install -y icu libicu libicu-devel

错误: configure: error: Please reinstall libedit - I cannot find readline.h
解决方法: yum install -y readline readline-devel
备注: 64位系统在编译时加上--with-readline, 可能还需要你去单独下载编译最新版本的libedit

错误: configure: error: Cannot find libtidy
解决方法: yum install -y readline readline-devel, apt install libtidy-dev libtidy5

错误: configure: error: Cannot find OpenSSL's <evp.h>
解决方法: yum install -y openssl openssl-devel libssl-dev

错误: configure: error: Please reinstall the BZip2 distribution
解决方法: yum install -y bzip2 bzip2-devel, apt install libbz2-dev

错误: configure: error: Please reinstall the libcurl distribution
解决方法: yum install -y curl-devel, apt install libcurl4-gnutls-dev

错误: configure: error: mcrypt.h not found.
解决方法: apt install libmcrypt4-dev libmcrypt-dev

错误: configure: error: Cannot find libpq-fe.h.
解决方法: apt install libpq-dev

错误: configure: error: Please reinstall readline - I cannot find readline.h
解决方法: apt install libreadline-dev

错误: configure: error: xslt-config not found.
解决方法: apt install libxslt1-dev

错误: configure: error: cURL version 7.10.5 or later is required to compile php with cURL support
解决方法: apt install libcurl4-openssl-dev, apt install libcurl4-gnutls-dev

错误: configure: error: xslt-config not found. Please reinstall the libxslt >= 1.1.0 distribution
解决方法: apt install libxslt1-dev, yum install -y libxslt-devel, 可能devel版本也不会大于1.1.0需要自行去官网编译安装

错误: configure: error: Unable to locate gmp.h
解决方法: apt install libgmp-dev

错误: configure: error: utf8_mime2text() has new signature, but U8T_CANONICAL is missing. This should not happen. Check config.log for additional information.
解决方法: apt install libc-client2007e-dev, apt install libc-client-dev

错误: configure: error: This c-client library is built with Kerberos support.
解决方法: apt install libkrb5-dev, 考虑加上--with-kerberos--with-imap-ssl参数

错误: configure: error: libfbclient, libgds or libib_util not found! Check config.log for more information.
解决方法: apt install firebird-dev, 可能会是apt install firebird2-dev

错误: configure: error: Cannot find ldap.h
解决方法: apt install libldap2-dev

错误: configure: error: Please reinstall the libzip distribution
解决方法: apt install libzip-dev

错误: configure: error: Package requirements (libzip >= 0.11) were not met: No package 'libzip' found
解决方法: yum install -y libzip-devel zip, 可能devel版本也不会大于0.11需要自行去官网编译安装

错误: configure: error: Package requirements (libxml-2.0 >= 2.7.6) were not met: No package 'libxml-2.0' found
解决方法: yum install -y libxml2-devel, 可能devel版本也不会大于2.7.6需要自行去官网编译安装

错误: configure: error: Package requirements (libcurl >= 7.15.5) were not met: No package 'libcurl' found
解决方法: yum install -y libcurl-devel, 可能devel版本也不会大于7.15.5需要自行去官网编译安装

错误: configure: error: Package requirements (oniguruma) were not met: No package 'oniguruma' found
解决方法: yum install -y oniguruma-devel oniguruma

过年到现在都挺忙的,还有游戏在等着我van,这篇文章拖的时间有点长

上次不是讲到家里树莓派在挂机嘛,用了frp穿外网可以在外面随时随地的在家下片,美滋滋

但是问题来了,家里硬盘里的资源我想在公司用了,平时也没有拷U盘的习惯,一般写完都是直接关闭保存在硬盘,最近笔记本都放在公司没拿回家,更是限制了我的操作。

于是闲暇之余写了个目录程序出来,当然写之前我也去网上找了下的,大部分都不是那种性(简)冷(洁)淡风格,老外的那种大大圆圆的看着太卡通了不适合我睾贵的身份,唯一一个上眼的就是DirectoryLister/DirectoryLister,但是需要把程序和文件放在一个目录下,已经拒绝了我去使用它。
网络上大部分可以找到的基本都是与DirectoryLister/DirectoryLister操作是相似的,均是放置在同一目录下。想想还是自己写吧????‍♂️,问题不大

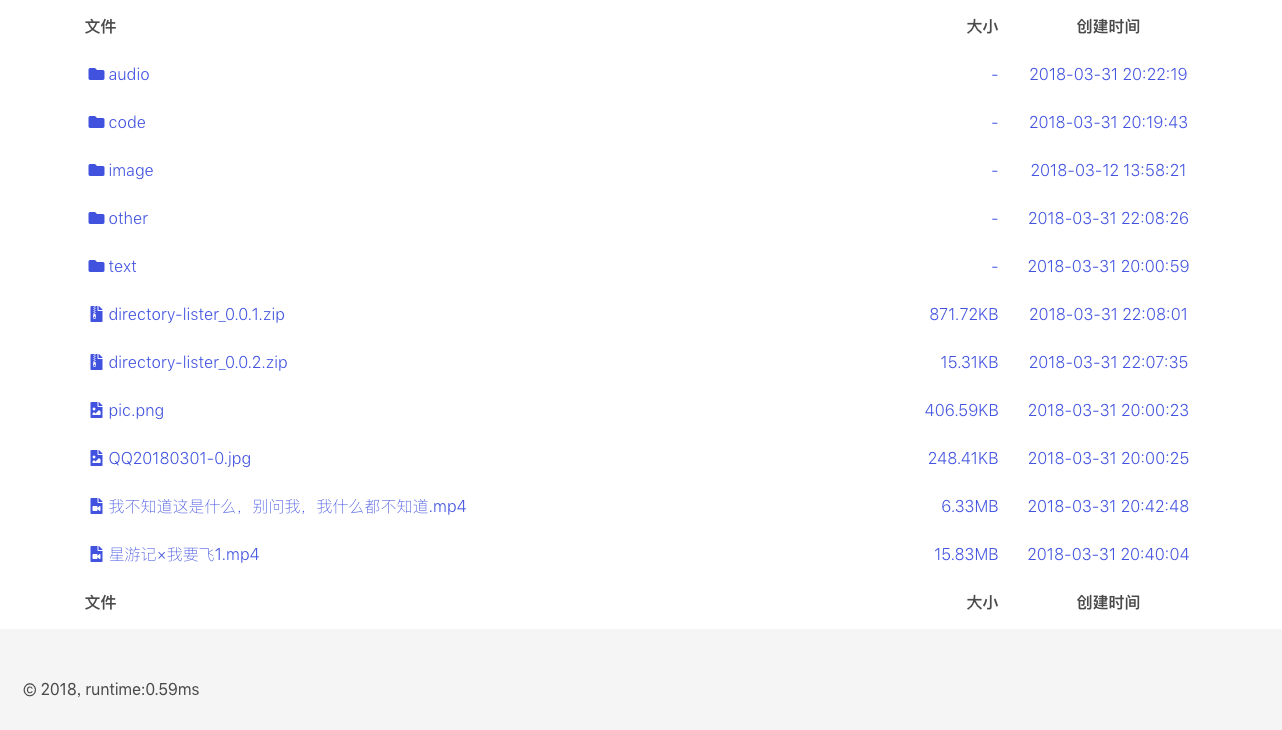
目录程序界面

项目地址: https://github.com/flxxyz/directory-lister
演示网址: http://cloud.flxxyz.com/

本程序适用于有一定的php知识储备的开发人员使用,小白用户使用请先了解一下composer使用

确保本身已经安装php再进行下面的操作

类unix

如macosx, ubuntu, centos, archlinux, debian这类系统

php -i | grep "/php.ini"

类unix系统

windows

如果没有添加环境变量,请将php目录添加至环境变量!!!

php -i | findstr "php.ini"

windows系统

通用

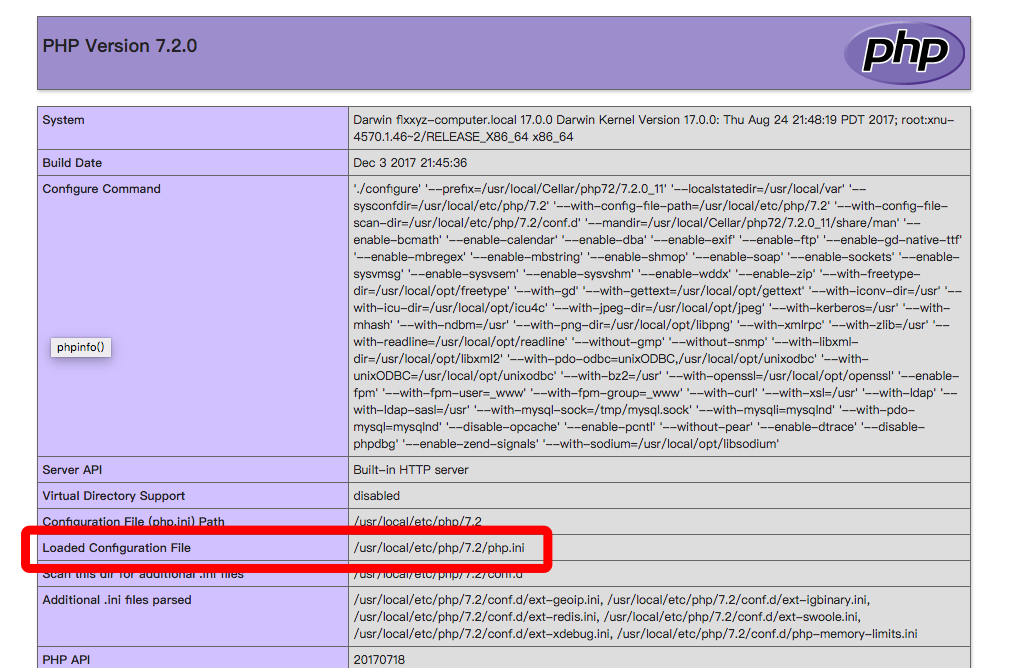
创建一个php文件,往里写入如下内容

  1. <?php
    echo phpinfo();

    通过浏览器访问

    通用

  2. echo(str_replace("\","/",str_replace("ext","php.ini",ini_get("extension_dir"))));

    慕若曦dalao评论区又给出来一种,明白的就用